North offers a range of products—from APIs and SDKs to plugins—that you can combine in various ways to help you fine-tune your app's payment processing.
In this article, you'll learn how to integrate two of these APIs—the Browser Post API and the Custom Pay API—for a highly secure and flexible payment solution.
Browser Post API and Custom Pay API Overview
Before we get to the tutorial, let's get an overview of these APIs and how you'll be using them.
The Browser Post API is an HTTP platform that allows you to set up a payment form on your website to securely send the customer's card information directly to the servers of North's in-house processor, EPX. Once the financial processing is completed, the customer's browser is redirected back to the merchant's site along with the results of the financial operation.
The major benefit of the Browser Post API is that it keeps the cardholder's data out of your environment, simplifying PCI compliance and helping prevent security compromises.
In this article, you'll learn how to combine the security benefits of the Browser Post API with the advanced functionality of the Custom Pay API. The Custom Pay API provides several API endpoints that make it easy to customize the flow of payment transactions according to your specific requirements. In addition to authorizing and capturing payments, these endpoints let you handle tasks such as issuing refunds, making tip adjustments, closing batches, and accessing information about previous transactions.
In the following sections, you will build a Node.js web application that uses the Browser Post API to tokenize, securely authorize, and capture a payment. You will then use the Custom Pay API to complete a refund.
The benefit of using both APIs is to make a sale with the Browser Post API—which, unlike the Custom Pay API, keeps credit card data out of the merchant's systems—and then pass the returned BRIC transaction token to one of the Custom Pay API's endpoints to perform additional actions such as making refunds.

Project Overview
Here is an overview of the Node.js app you'll build in this tutorial. You'll create a web page with a button that a customer can click to indicate that they are ready to check out. The app will make a terminal authorization code (TAC) request to the EPX servers and load the payment form.
The customer will then fill out the payment form that will post the data directly to the EPX servers for processing, bypassing your system completely. This will be a CCE1 transaction type (ecommerce purchase authorization and capture transaction). You can refer to the EPX Data Dictionary in the Supplemental Resources folder for more information on transaction types.
Once the payment is processed and the results are posted to your redirect URL, you will display a payment results page that shows whether the transaction was authorized and captured successfully. All of this is done using the Browser Post API.
On the payment results page you will also display a refund button. Clicking this button will use the Custom Pay API's /refund/{BRIC} endpoint to return the funds to the user’s account and show the results in the browser.
Prerequisites
To follow along with this tutorial, you'll need the following:
- Node.js installed on your local machine
- A code editor and a web browser
- A GitHub account to host your code
- A free Render account to deploy the Node.js application
You also need to contact the North Integration team for test credentials. Make sure you provide a REDIRECT_URL when requesting them. The REDIRECT_URL is where the Browser Post API payment results are posted after processing.
Lastly, create a root folder for your project called browser-post-custom-pay-apis and open it in your terminal.
Setting Up the Server
In this section, you will set up the server that will be used to serve the EJS templates, request a TAC from the EPX servers, and implement the logic to capture and refund a transaction.
First, you'll set up the server logic. This is where you will integrate the Custom Pay API to refund the transaction that's been authorized and captured using the Browser Post API.
With the browser-post-custom-pay-apis folder open in your terminal, execute the command below to initialize a Node.js project:
Next, open the package.json file and replace the scripts key-value pair with the following:
This script starts the Node server.
Next, execute the command below to install all the dependencies required for this project:
Here is how each of these dependencies will be used:
express: to set up a Node.js serverejs: to create HTML templatescors: to enable cross-origin resource sharingdotenv: to load environment variables from an.envfileform-urlencoded: to createx-www-form-urlencodedstring dataquerystring: to parse the HTML form data received from the Browser Post APIjsdom: to traverse the XML tree returned from the North key exchange service and extract the TACnode-fetch@2: to make API requests to the EPX servers
Next, in the project root folder, create a file named server.js, which will be used as the entry point into the Node server and implement the server logic. Paste the code below into it:
The code above imports the required dependencies, applies some configurations (commented in the code) to your Express application, and defines a paymentResult variable that will be used to hold the payment results received from the Browser Post API. It then defines five API endpoints:
- The
GET /endpoint is used to render the homepage template, which you'll create later in the tutorial. - The
POST /getTACendpoint is used to make a TAC request to the EPX Sandbox Key Exchange service. When making the TAC request, North recommends setting theContent-Typeheader value toapplication/x-www-form-urlencoded. The required fields for this request areAMOUNT,MAC,TRAN_NBR,TRAN_GROUP, andREDIRECT_URL. TheMACvalue is provided by the Integrations team,AMOUNTrepresents the total amount for the transaction,TRAN_NBRrepresents the transaction number in the current batch,TRAN_GROUPvalidates that theTRAN_CODEsubmitted during the transaction corresponds to a general category of payment types, and theREDIRECT_URLtakes in the value of the redirect URL that you provided to the Integrations team. For this transaction, you will useSALEas the value for theTRAN_GROUPfield. It indicates that this is an authorization and capture transaction. This request returns a response in XML format, and the code uses thejsdompackage to traverse the XML tree and extract the TAC value. - The
GET /paymentFormendpoint retrieves some environment variable values and renders thepaymentFormtemplate with some data. You will learn more about these values when working on the EJS templates in the next section. - The
POST /paymentResultendpoint receives the Browser Post API payment results from the EPX servers. The result is an HTML form. The code uses thequerystringpackage to extract the form fields and their corresponding values and convert the result to a JSON object usingJSON.parse('{"' + decodeURI(data.replace(/&/g, "","").replace(/=/g,"":"")) + '"}'). The object is then assigned to thepaymentResultvariable, and the route renders theresulttemplate that shows and passes the required transaction data. - The
GET /refundPaymentendpoint refunds a payment to the customer’s account. To make a refund using the Custom Pay API, you make a POST request to /refund/{BRIC} endpoint. This endpoint allows you to make a refund to a previously authorized and captured transaction using itsBRICtransaction token. TheBRICtoken, also referred to as theGUIDtoken, is a globally unique identifier that is used to represent a transaction performed on the EPX servers.
The GET /refundPayment endpoint endpoint takes in several headers:
EPI-Idis provided by the North integrations team.EPI-Signatureis generated by following the instructions in the "How To Authenticate" section of the Custom Pay API Integration Guide.Content-Typeis the content type of the message.EPI-Traceis a unique value defined by the merchant that's used to identify a transaction. This value is not persisted with the transaction and is only required in the current request/response chain.BRICis the unique token generated for each transaction.
The request body for this endpoint takes in the following values:
- The
amountis a positive dollar amount for the funds to be transferred during the transaction. - The
transactionis a unique code defined by the merchant to identify a transaction. - The
batchIDis a unique number defined by the merchant to identify a batch of transactions. - The
industryTypeis the industry to which the transaction belongs. You can refer to the EPX Data Dictionary located in the Supplemental Resources folder for the values allowed or check out the Custom Pay API specification. - The
cardEntryMethodindicates how the card number for the transaction was entered. You can refer to the EPX Data Dictionary located in the Supplemental Resources folder for the values or check out the Custom Pay API specification.
The GET /refundPayment endpoint defines a payload object containing all the fields required for the request body. The endpoint for the transaction is then concatenated with the payload, and the result is stored in a variable named concat_payload. Next, add the code to generate the EPI-Signature following the instructions in the "How To Authenticate" section of the Custom Pay API Integration Guide.
Lastly, it defines a headers variable with all the values required for the request headers and makes a POST request to the Custom Pay API /refund/BRIC endpoint to make a refund. Once the transaction is processed and the result is received, it renders the refundResult template and passes the required data.
Setting Up the EJS Templates
With the server logic ready, you will now implement the EJS templates that you will use to interact with the system. This is where you will integrate the Browser Post API to authorize a transaction.
In the project root directory, create a new folder named views and a new file in it named home.ejs. Add the code below to this file:
The code above renders a Pay $11.99 button. When a user clicks the button, it makes a POST request to the /getTAC API route with the hard-coded amount variable that represents the total transaction amount. When the API returns the response, this template saves the TAC and the transaction amount to the local storage and redirects the user to the /paymentForm page.
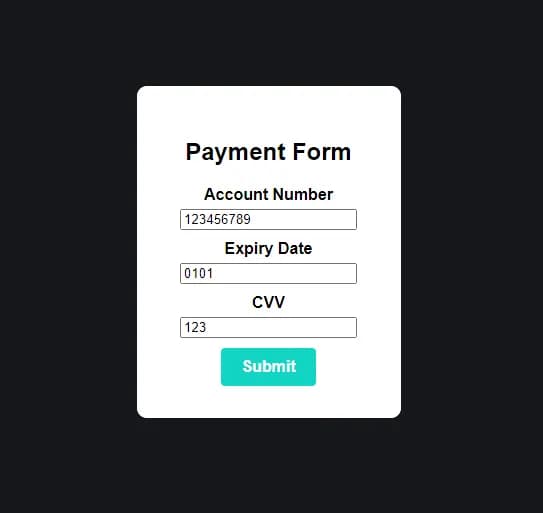
Next, in the views folder, create a file named paymentForm.ejs and add the code below to it:
This code renders a form that collects the payment data from the user and POSTs it directly to the EPX servers (Sandbox Payment URL). The following are the required fields for this form:
ACCOUNT_NBR: the customer's credit card numberEXP_DATE: the credit card's expiry dateCVV2: the card's security codeTRAN_CODE: identifies the type of transaction to be processed and is related to theTRAN_GROUPfield you used earlier. For this transaction, you will useSALEas the value for theTRAN_CODEfield, which indicates that this is an authorization and capture transaction.CUST_NBR,MERCH_NBR,DBA_NBR, andTERMINAL_NBR: provided by the North Integrations teamINDUSTRY_TYPE: identifies the industry type of the transactionTAC: received after sending a TAC request to the EPX serversAMOUNT: total amount for the transaction
The code above displays only the account number, CVV, and expiry date fields and hides the rest since they do not need to be displayed to the user.
Next, create a result.ejs file in the views folder and add the code below to it:
The code above displays the results of the transaction made using the Browser Post API. It also displays a Request Refund button that makes a GET request to the /refundPayment endpoint.
Next, create a refundResult.ejs file in the views folder and add the code below to it:
The code above displays the results of the refund made using the Custom Pay API.
Testing the Application
Now that the application is fully set up, you can deploy it and test whether it works as expected. Upload your application code to GitHub and deploy it on Render .
When deploying your application, make sure to set yarn start as the Start Command and to configure your environment variables . The environment variables that you should set include MAC, TRAN_GROUP, REDIRECT_URL, TRAN_CODE, CUST_NBR, MERCH_NBR, DBA_NBR, TERMINAL_NBR, INDUSTRY_TYPE, EPI_KEY, and EPI_ID. The values for these fields have been discussed throughout the article.
To test the app, open the deployed app's link provided by Render. If you click the "Pay Now" button, you should be navigated to a web page that renders a payment form which has been prefilled with the test details provided by North. If you click Submit, you should be navigated to a page that shows the results of the transaction and a button to request a refund. If you click the Request Refund button, you will be navigated to the refund results page.
How To Get Started
In this guide, you have learned about how you can use North's Browser Post API and Custom Pay API to fine-tune payment processing for your Node.js web application. You have learned how to use the Browser Post API to securely send card details to the EPX servers and the Custom Pay API to make a refund.
The combination of these solutions lets you keep sensitive cardholder data out of your server environment while benefitting from the advanced functionality provided by the Custom Pay API. Contact us to learn more about how these tools can meet your business needs.